In this Quick Tip tutorial, you will learn how to create a glowing text effect from a scratch in Adobe Photoshop CS3 using Layer Styles.
Final Image Preview

Start working by creating a new document (
Ctrl+N) in
Adobe Photoshop CS3 with the size
1900px by
1200px(
RGB color mode) at a resolution of
72 pixels/inch. Use the
Paint Bucket Tool (G) to fill with
black color the
new background layer.

On a new layer (
Create new layer) we’ll select the
Soft Round brush.

Use this brush to represent a spot on the central part of the canvas. The brush’s color is
#007EC7
Apply the next filter for the layer containing the spot:
Fitler>Distort>ZigZag

We’ve got the next result:

Set
Fill to
54% for this layer.

Next we’ll choose the
Rectangle Tool (U) to represent three white lines which must be turned over with
Free Transform (Ctrl+T) command.
Combine in a group all three layers with the white lines (press CTRL button to select the necessary layers and hold on the left mouse’s button while dragging the selected layers on Create a new group icon from bottom part of the Layers panel).
Select the group now and then press CTRL+E to Merge Down. On the rasterized layer we’ll apply the next filter:Fitler>Distort>Wave

We’ve got the next result:

On the same layer we need to apply also
Filter>Blur>Gaussian blur

We’ve got the next result:

Set
Fill to
44% for this layer and change the
Blending mode to
Overlay. Click on
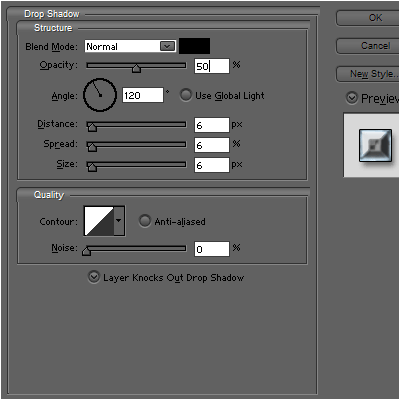
Add a layer style icon from bottom part of the
Layers panel and select
Drop Shadow.

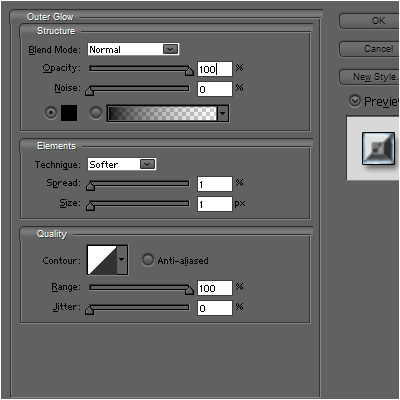
Add
Outer Glow:

We’ve got the next result:

Make a copy of the recently made layer and choose
Free Transform (Ctrl+T) command to turn over the copy the same way demonstrated on the picture.

Now we need to
create a new layer, select here
Soft Round brush.

Use this brush to paint the new layer in two colors (on the top part we’ll choose the green color, on the bottom – the blue one) (
Opacity – 10%).

On the next new layer we’ll paint again with
Soft Round brush brush of white color and
Opacity – 30%.

We’ve got the next result:

Set the
Blending mode for this layer to
Overlay.

For the next step we need the Adobe Illustrator. Create a new document and use the
Pen Tool (P) to draw two lines of black color.

Select now the
Direct Selection Tool (A) to select both lines and apply the next option:
Object>Blend>Blend Options

Apply next
Object>Blend>Make

Select the wave’s lines and press
CTRL+C to
Copy. Then pass to Adobe Photoshop. Press
CTRL+V and select
Paste As: Smart Object.

Press
CTRL+I to
Inverse the layer’s color.

Set the
Blending mode for this layer to
Overlay.

Make a copy of the recently made layer and choose
Free Transform (Ctrl+T) command to turn over the copy the same way demonstrated below. Set for the copy’s layer
Blending mode to
Soft Light.

Insert the mask on each layer containing the wave’s lines by choosing
Add layer mask on the bottom part of the
Layers panel and choose the
Soft Round brush of
black color (set
Opacity to
20% in
Options bar).

Paint in the masks using this brush to clean out the wave’s edges.

Select the
Horizontal Type tool (T). Select a font, size and color in the
Character panel.

Click in the canvas and type “Colorful”. Press
Enter to apply the text.

Set
Fill to
0% for this layer and click on
Add a layer style icon from bottom part of the
Layers panel to
Drop Shadow.

Add
Inner Shadow:

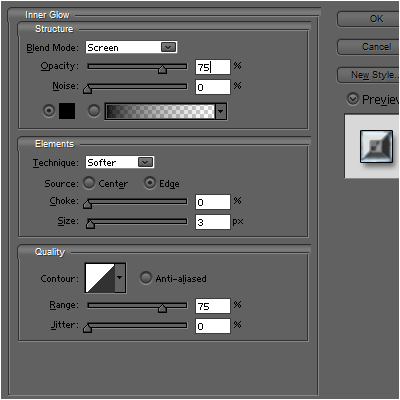
Set
Inner Glow:

Apply
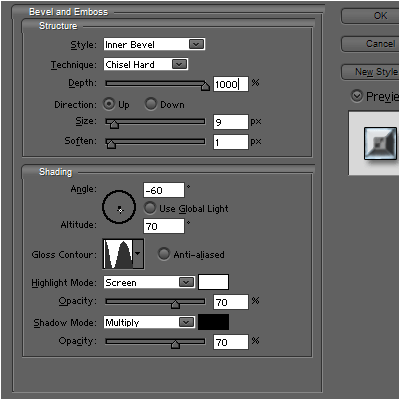
Bevel and Emboss:

Settings for
Bevel and Emboss>Contour:

Add
Satin:

Apply
Gradient Overlay:

Click in the
color bar to open the
Gradient Editor and set the
color stops as shown. Click
OK to close the
Gradient Editor dialog box.

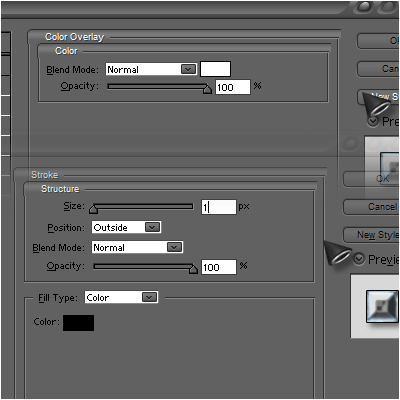
Add
Stroke:

We’ve got the next result:
 Create a new layer
 and select the
Soft Round brush of white color (
Opacity – 50%).

Use this brush to represent many dots.

Set the
Blending mode for this layer to
Overlay.

Make a copy of the last made layer:

Make one more copy of the last made layer and choose again
Free Transform (Ctrl+T) command to turn around its axe the copy’s layer. Set the
Blending mode for this layer to
Normal.

Make a copy of the last made layer, selecting here the next filter:
Filter>Blur>Radial blur

We’ve got the next result:

Set the
Blending mode for this layer to
Overlay.

Next we need to represent a highlight on the text, choose the
Pen Tool (P), set the
drawing mode on
Shape Layers in
Options bar and draw the next shape as shown.

Now press
Ctrl button and click on the text’s layer in
Laters panel. In this case we’ll get the next selection.

Select the highlight’s layer and click on the bottom part of the layers’ panel on
Add a Mask.

Set
Fill to
0% for this layer and change the
Blending mode for this layer to
Linear Light.
The final result!
Thanks For
www.adobetutorialz.com


 Thanks For